
# How to Integrate yCrash with Cisco AppDynamics (Step-by-Step)
Before proceeding, We would suggest to read the related documentation:
- Alert and Respond (opens new window)
- Policies (opens new window)
- Health Rules (opens new window)
- Actions (opens new window)
- Remediation Actions (opens new window)
- Prerequisites for Local Script Actions (opens new window)
# 1. Install the machine agent in the node (opens new window):
Please follow the below steps to install the machine agent if you haven’t installed it yet. In this documentation we have used an Ubuntu machine. Here are instructions to install the machine agent -
OS: Ubuntu 22.04 LTS
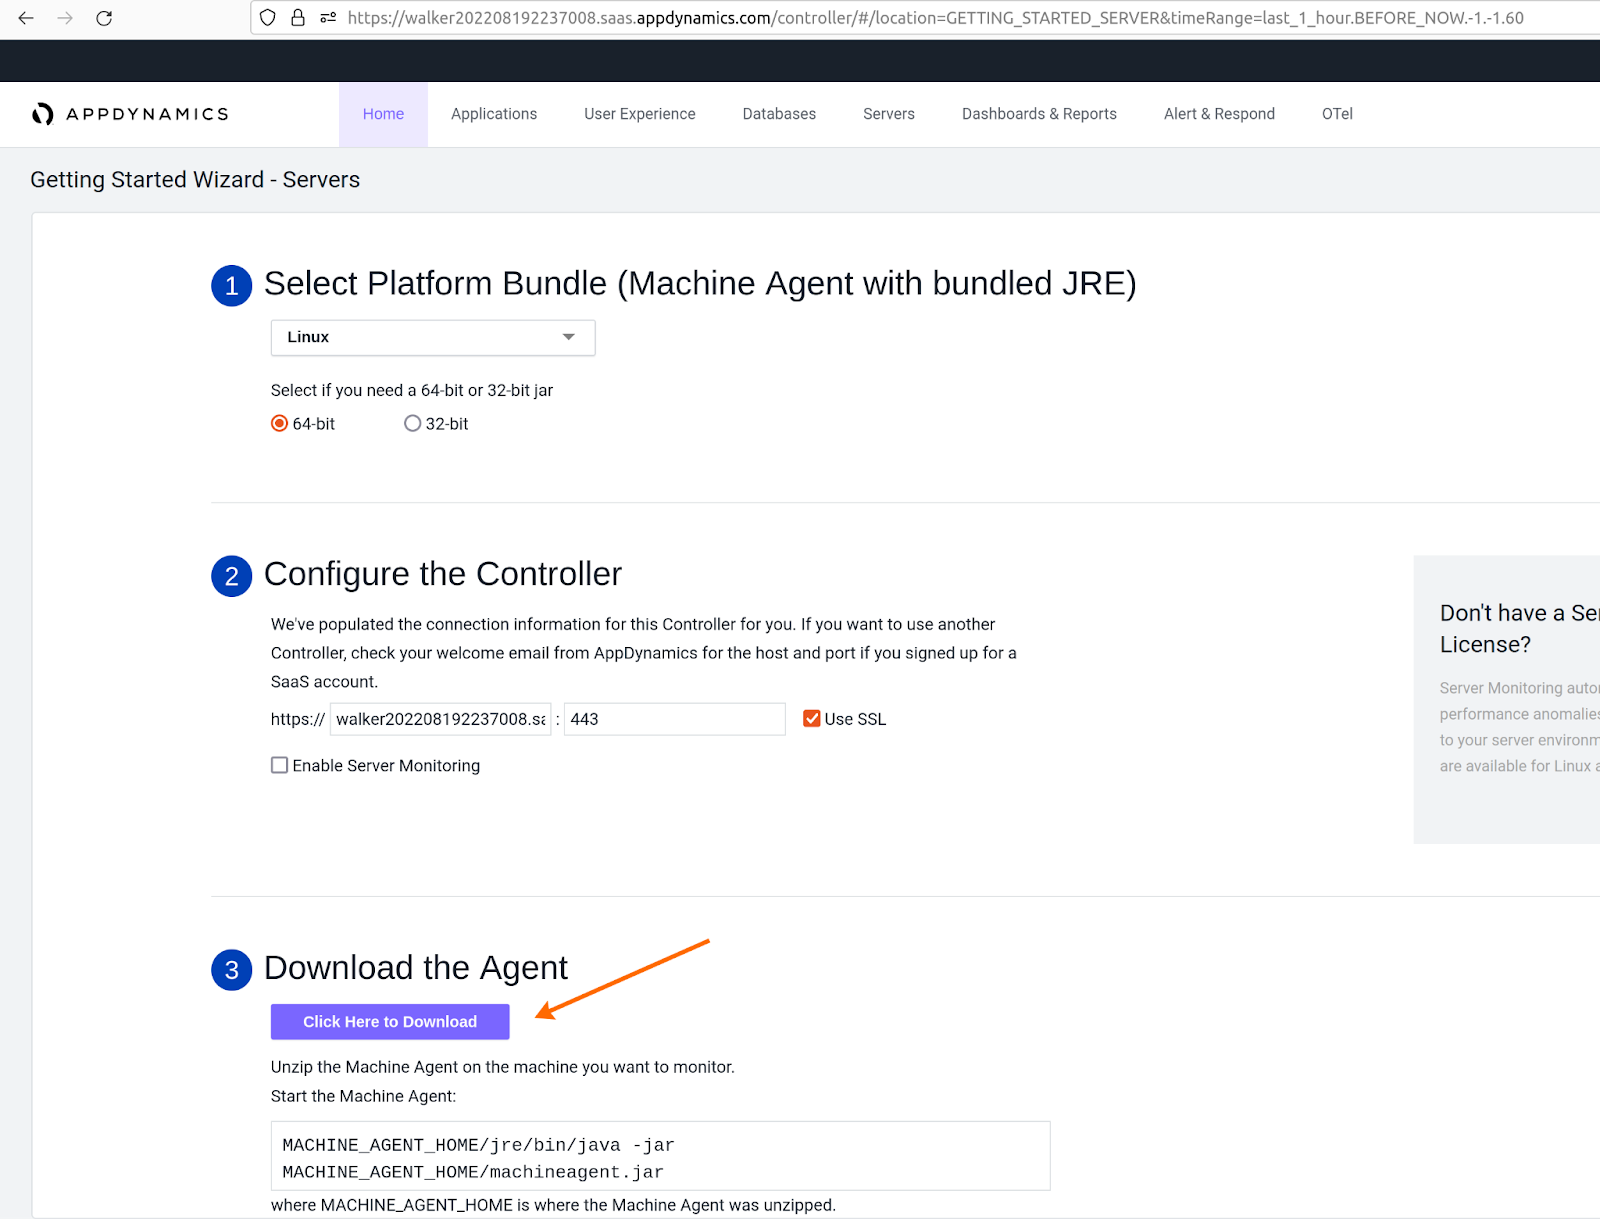
Download Machine-agent:
Note: Replace YOURACCOUNT with your account subdomain in the above URL.
- Click the button Click here to download to download the agent.
- Copy the downloaded file to the machine. (you can use rsync / scp / ftp)
- Installation steps:
- Execute the following commands to install the machine agent.
apt update && apt install default-jre default-jdk unzip

mkdir /opt/appdynamics/machine-agent -p; cd /opt/appdynamics/machine-agent

# Copy the downloaded agent file to this directory (/opt/appdynamics/machine-agent)
cp <DOWNLOADED_AGENT_FILE> /opt/appdynamics/machine-agent

# Unzip the file you just copied using the below command
unzip machineagent.zip
2
3
4
5
6
7
8
9
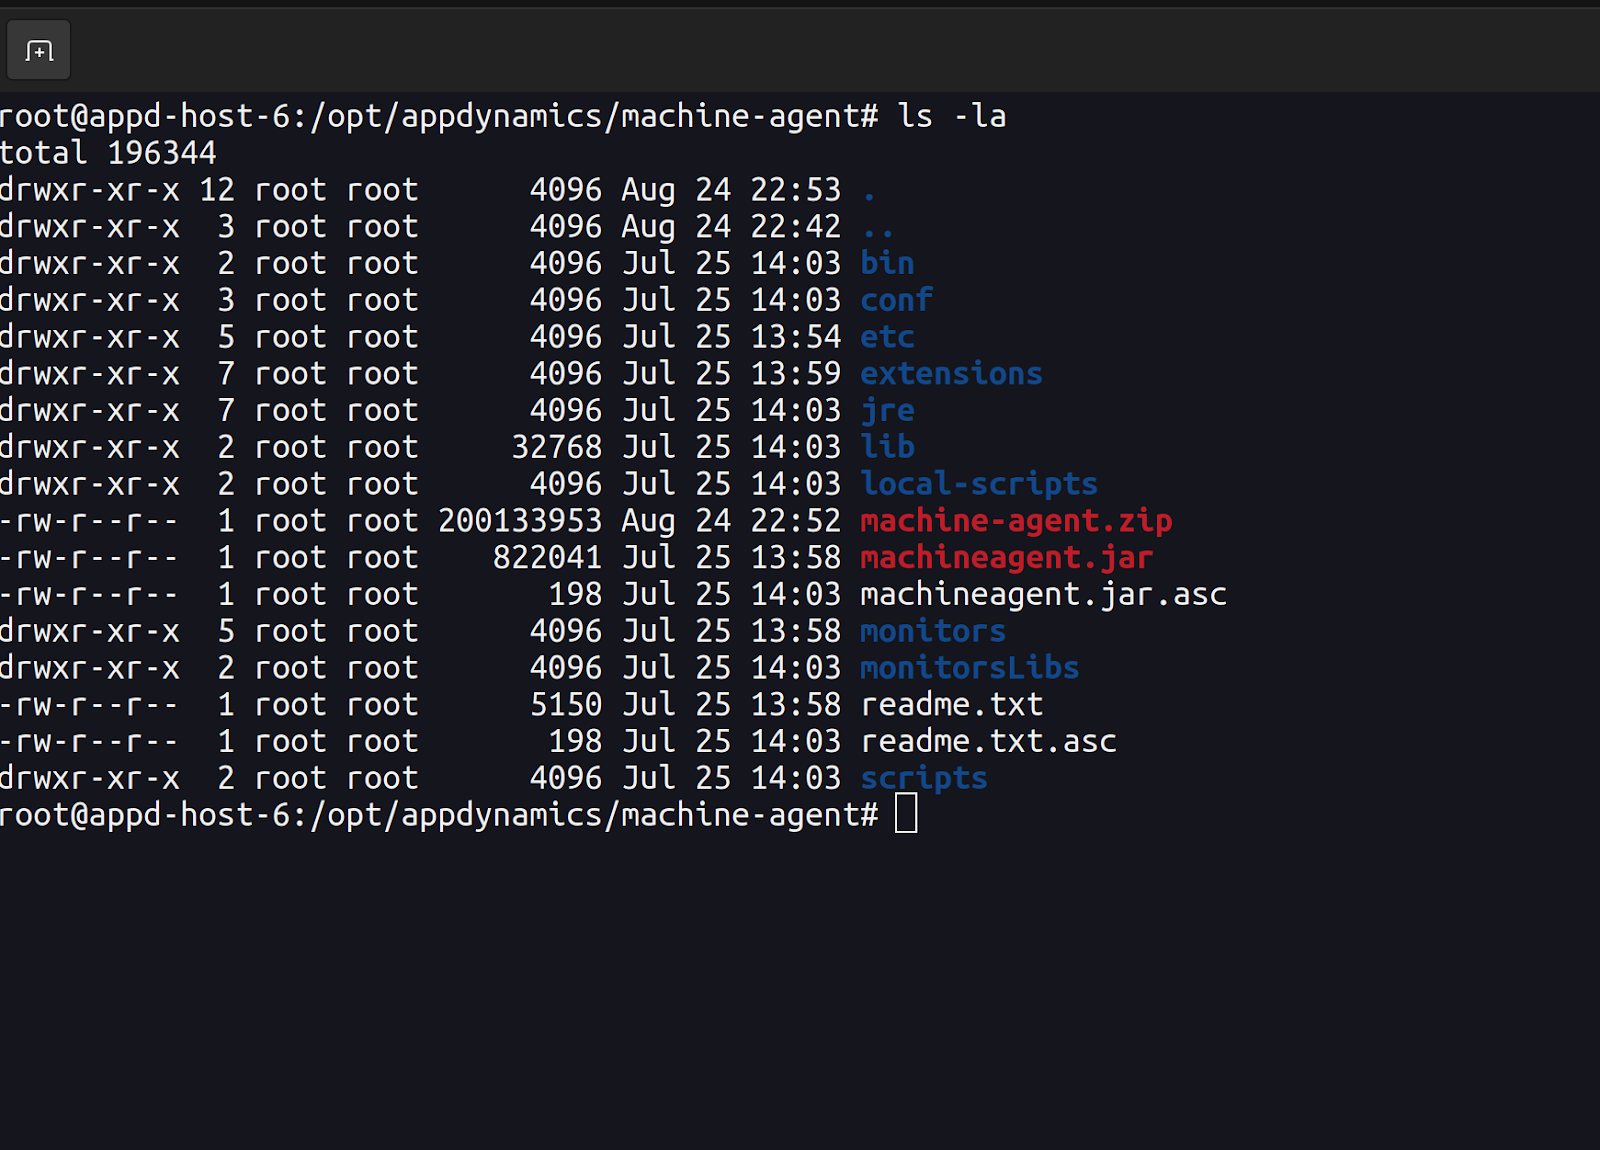
- The downloaded machine-agent bundle is shipped with JRE. However, using the bundled JRE gives us the following errors:
Using java executable at /opt/appdynamics/machine-agent-2/jre/bin/java

./bin/machine-agent: 90: exec: /opt/appdynamics/machine-agent-2/jre/bin/java: Exec format error
2
3
So, let’s use the system default-jdk and delete the bundled jre directory using the below command:
rm -rf jre
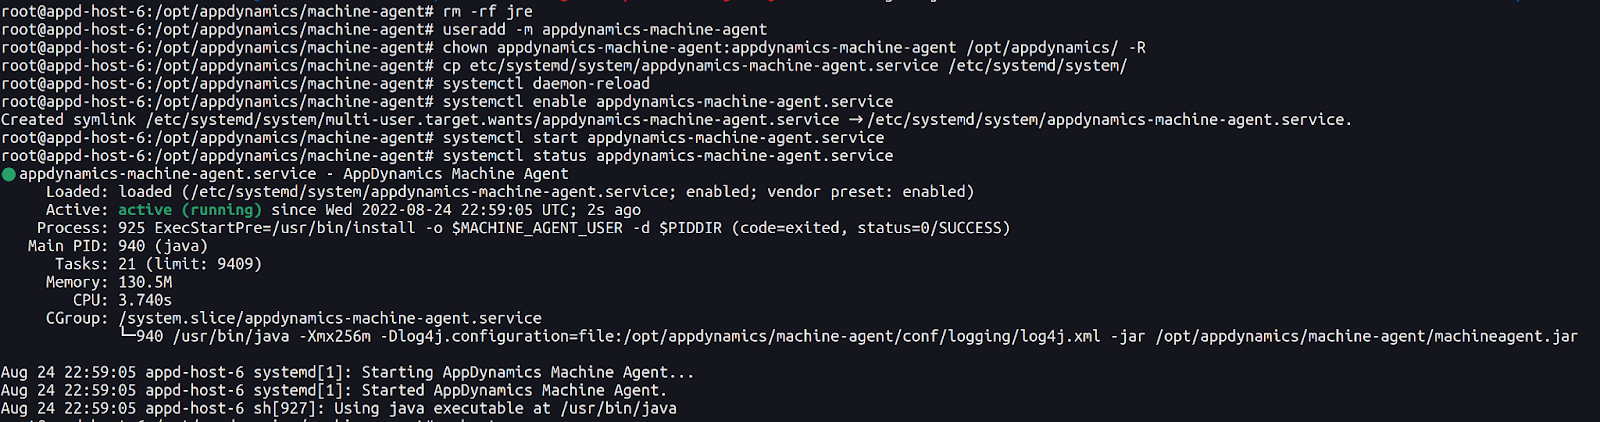
- Run as systemd service:
useradd -m appdynamics-machine-agent
chown appdynamics-machine-agent:appdynamics-machine-agent /opt/appdynamics/ -R
cp etc/systemd/system/appdynamics-machine-agent.service /etc/systemd/system/
systemctl daemon-reload
systemctl enable appdynamics-machine-agent.service
systemctl start appdynamics-machine-agent.service
systemctl status appdynamics-machine-agent.service
2
3
4
5
6
7
# 2. Install the app agent in the node (opens new window)
Please follow the below steps to install the app agent if you haven’t installed yet. Here are the installation instructions:
Goto Applications from the main menu on the top.
Click Create Application.
Choose Create an Application using the Getting Started Wizard.
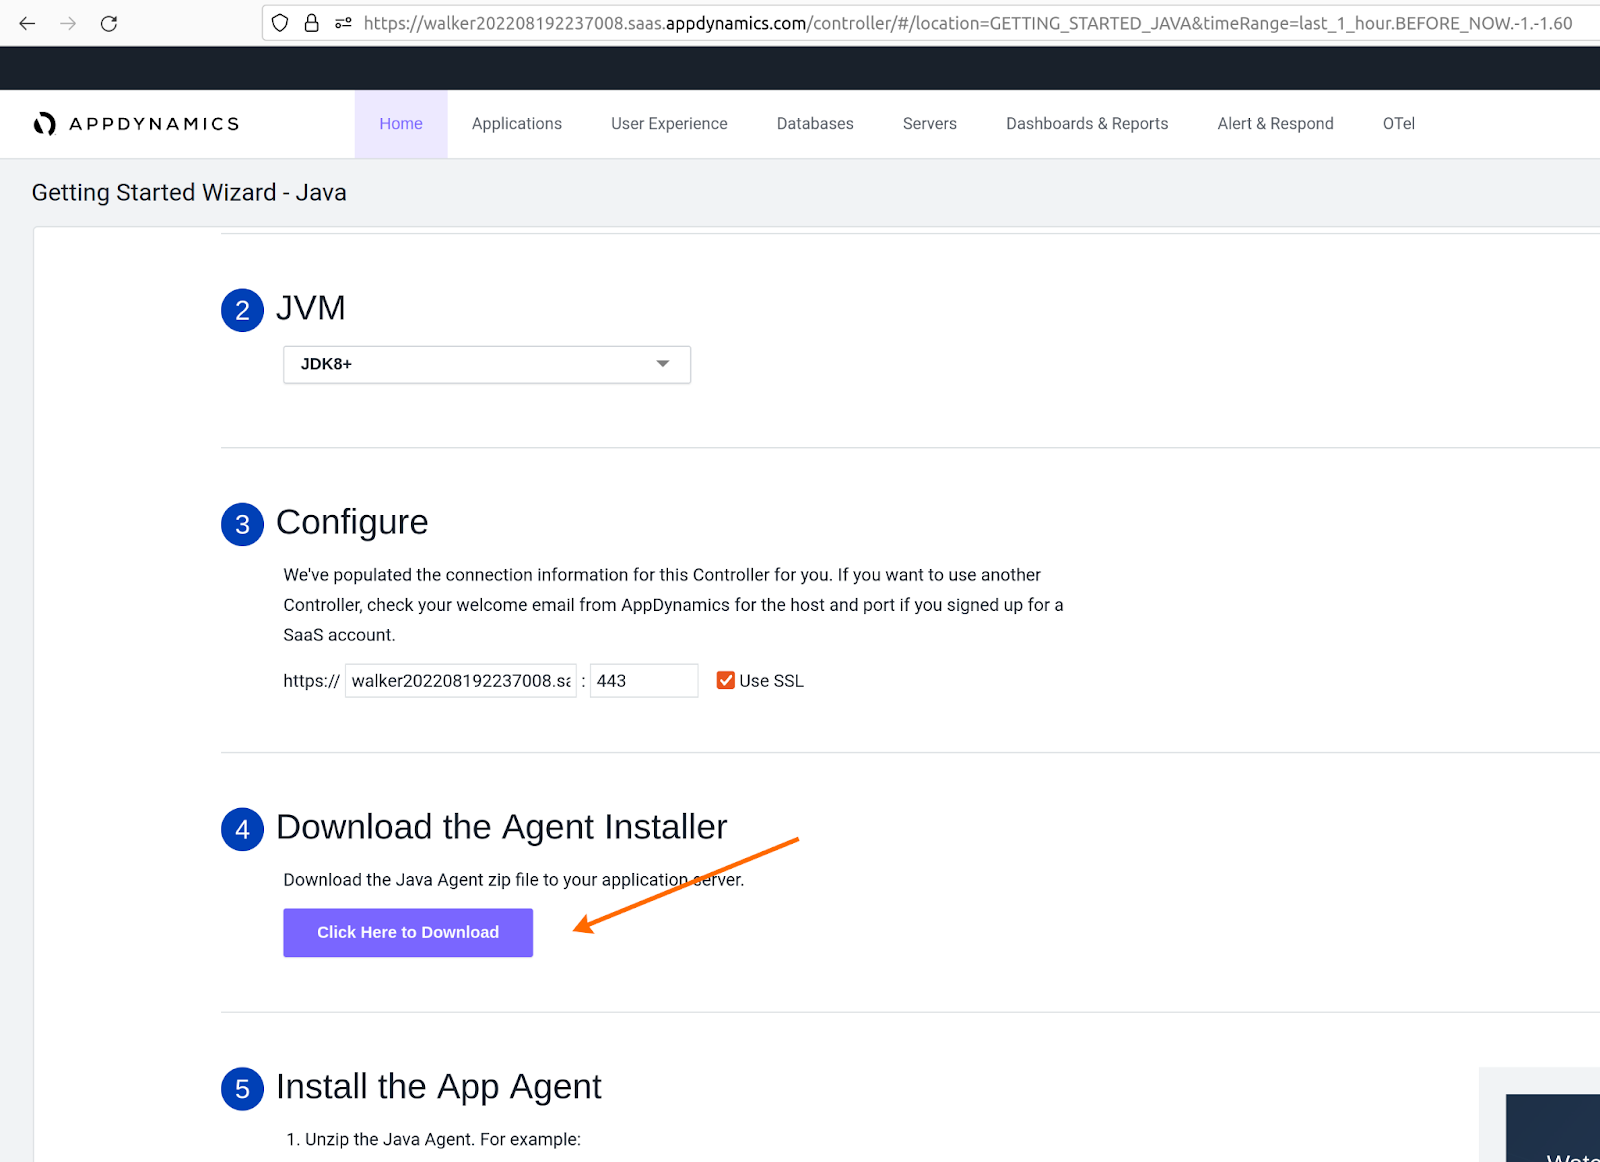
On Getting Started Wizard, choose: Applications: Java.
Then on Section 4. Download the Agent Installer, click Click Here to Download button.
Upload the agent file to the machine using scp / rsync / ftp.
Create a new directory and put the agent file in
/opt/appdynamics/appagentdirectory.
mkdir /opt/appdynamics/appagent -p; cd /opt/appdynamics/appagent
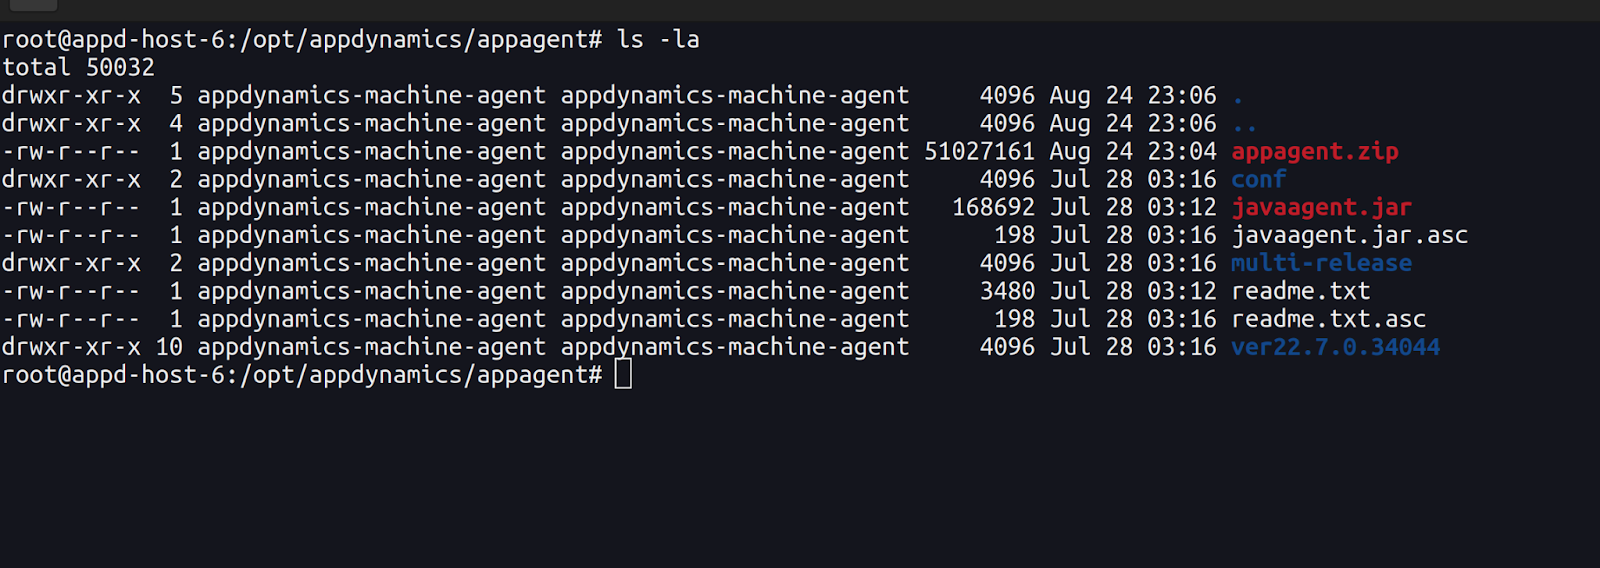
- Unzip the file using the below command.
unzip appagent.zip
- Run
hostnamecommand to get your host name. Note it for the next step.
hostname
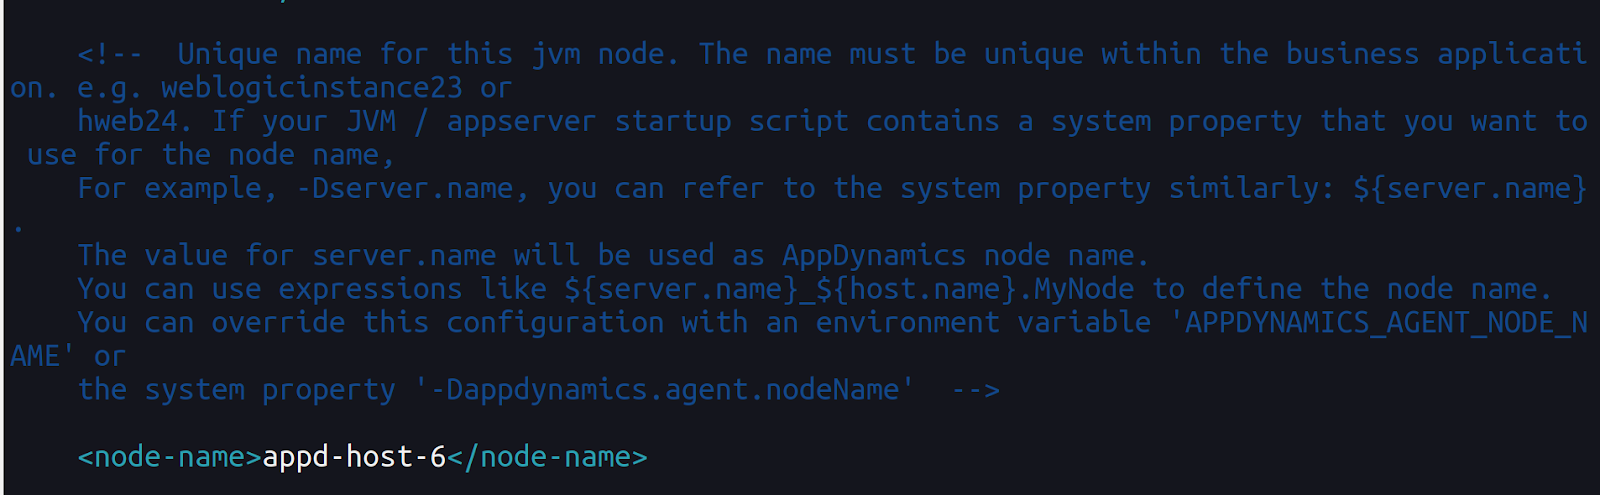
- Edit
/opt/appdynamics/appagent/conf/controller-info.xmlto update the<node-name>value.
<node-name>YOUR_HOST_NAME</node-name>
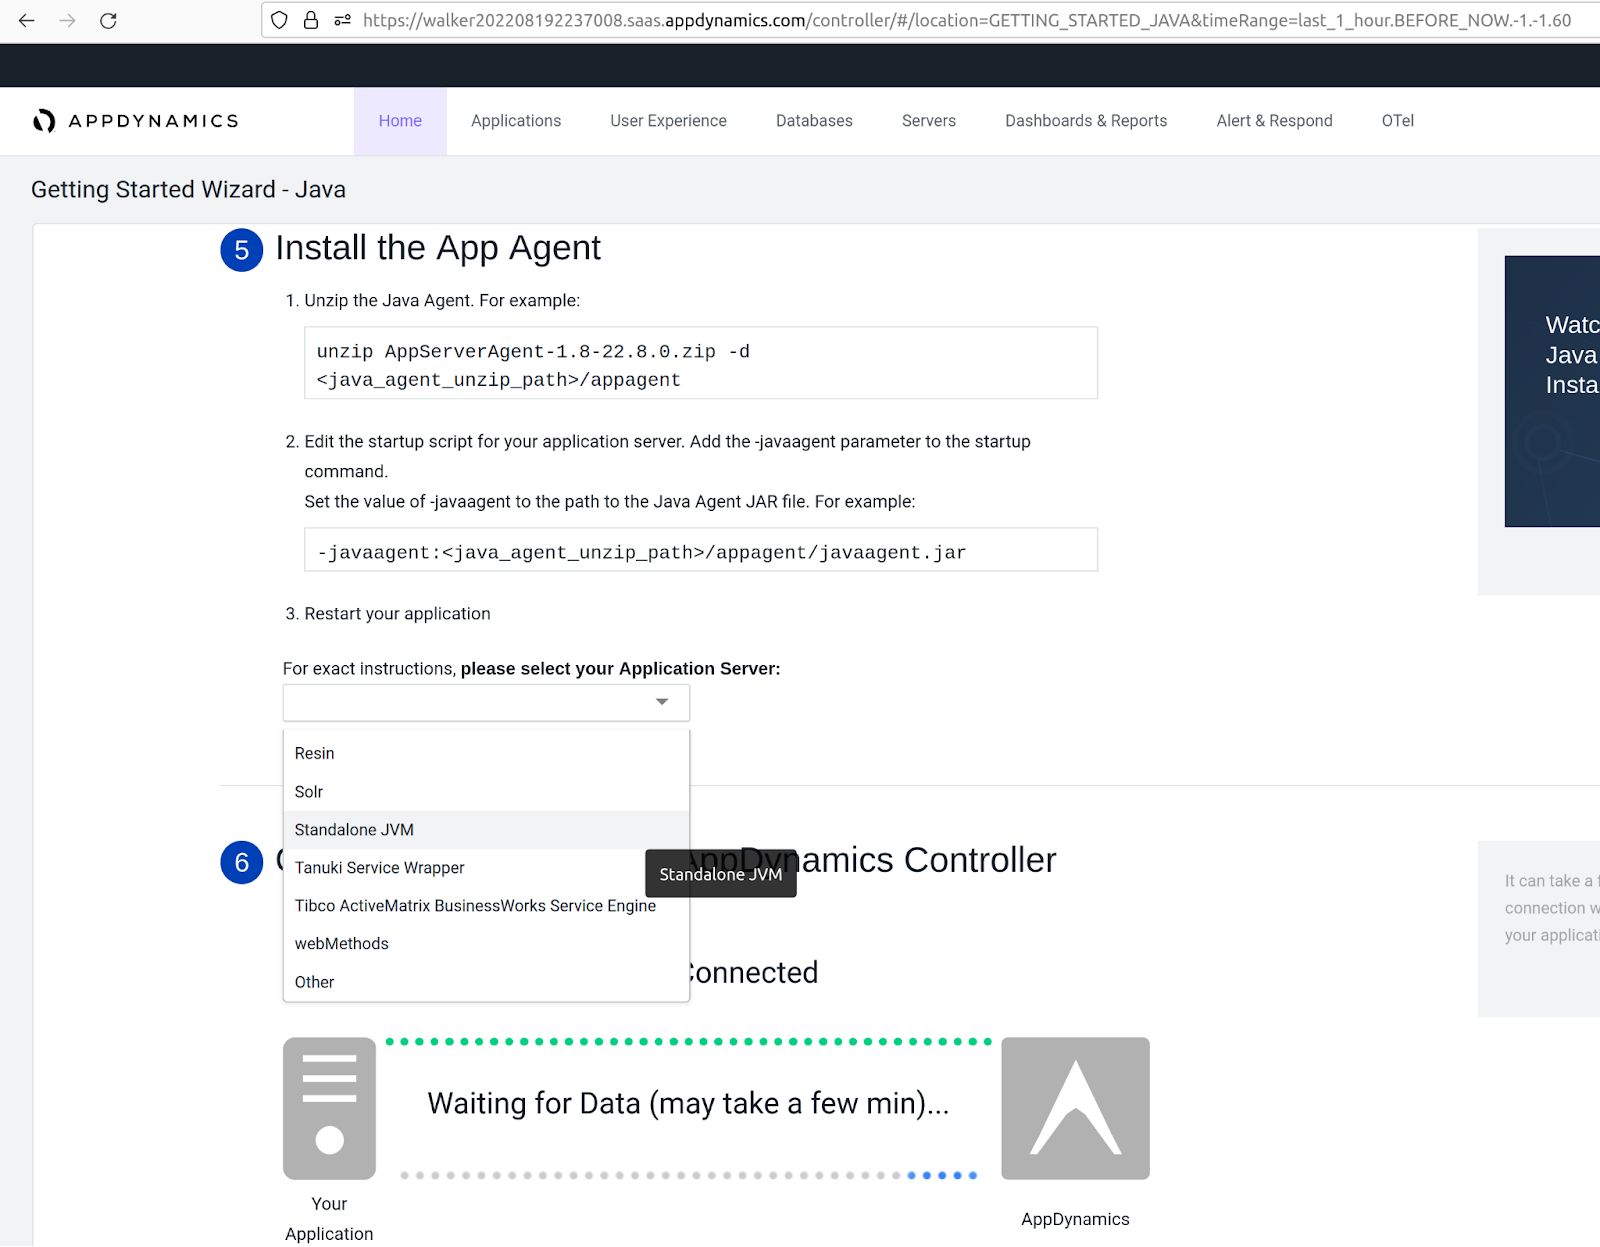
- Follow the specific instructions for your Application server on section 5. Install the App Agent. In this document, we have selected Standalone JVM as we are using BuggyApp as a target java application.
# 3. Start your Java application with the app-agent enabled, follow step 11 above
Here we are using BuggyApp (opens new window) as a java application. You can replace BuggyApp with your java application.
Run the below commands to download and run the BuggyApp.
- Create a new directory for Buggyapp.
mkdir /opt/ycrash/buggyapp -p; cd /opt/ycrash/buggyapp
- Download Buggyapp and unzip the file once it's downloaded.
wget https://tier1app.com/dist/buggyapp/buggyapp-latest.zip
unzip buggyapp-latest.zip
2
- Modify
launch.shscript.
- Because BuggyApp is a standalone JVM, by following step 11 of previous step, add the "-javaagent" argument in
launch.shfile as shown below:
java -javaagent:"/opt/appdynamics/appagent/javaagent.jar" -Xmx2g -DlogDir=. -DuploadDir=. -jar webapp-runner-8.0.33.4.jar --port 9010 buggyapp.war
- To run the BuggyApp application execute the
launch.shscript.
launch.sh
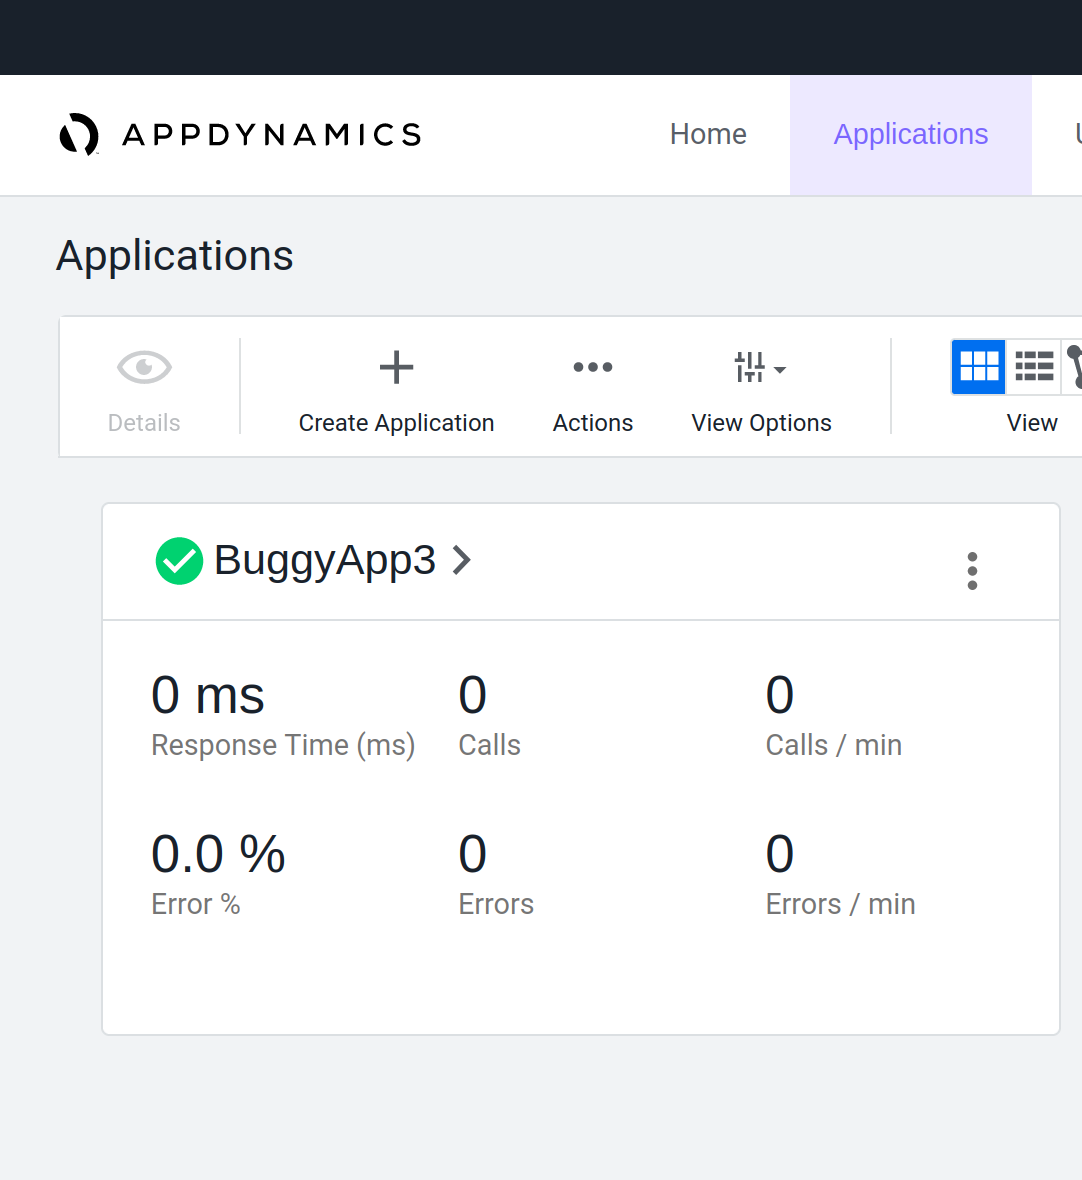
Wait a few minutes until the application shows up in the Applications menu.
# 4. Create / Review Health Rules
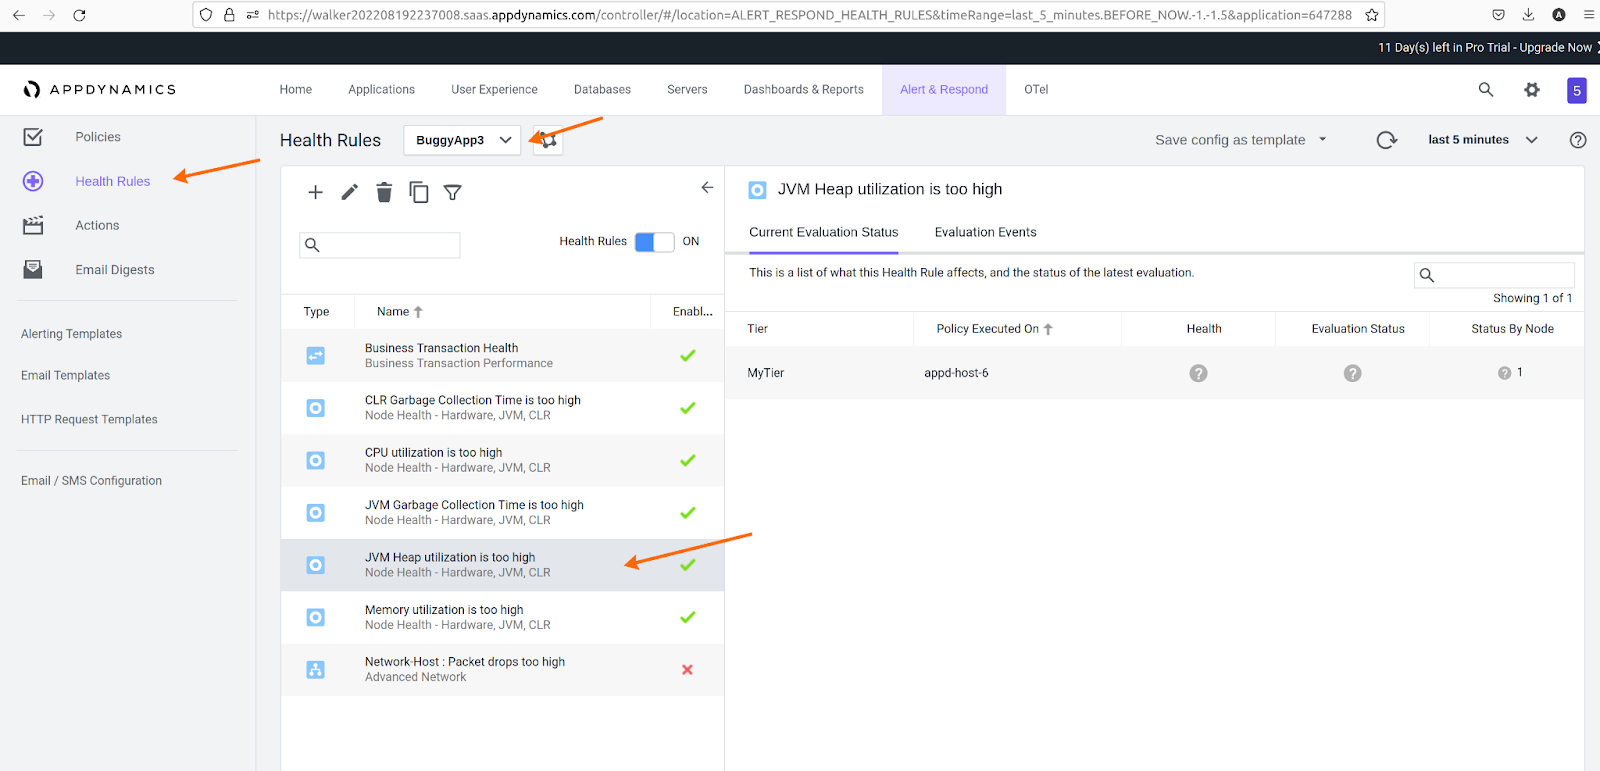
Goto Alert & Respond from the main menu on the top.
Click Health Rules from the left sidebar.
Select your application from the Applications dropdown.
There are about 7 default health rules. For example - Business Transaction Health, CLR Garbage Collection Time is High, CPU utilization is high, etc…
You can define your own health rules, but in this document we will just use the default JVM Heap Utilization is too high.
- The default rules have a quite long attribute Wait Time after Violation: 30 minutes. You can change this value based on your requirement. Please follow the below steps to change the value:
a) Right click and select Edit option.
b) Wait Time after Violation: 30 minutes.
c) Critical Criteria -> Specific Value: update from 90% to 70%.
# 5. Create an Action
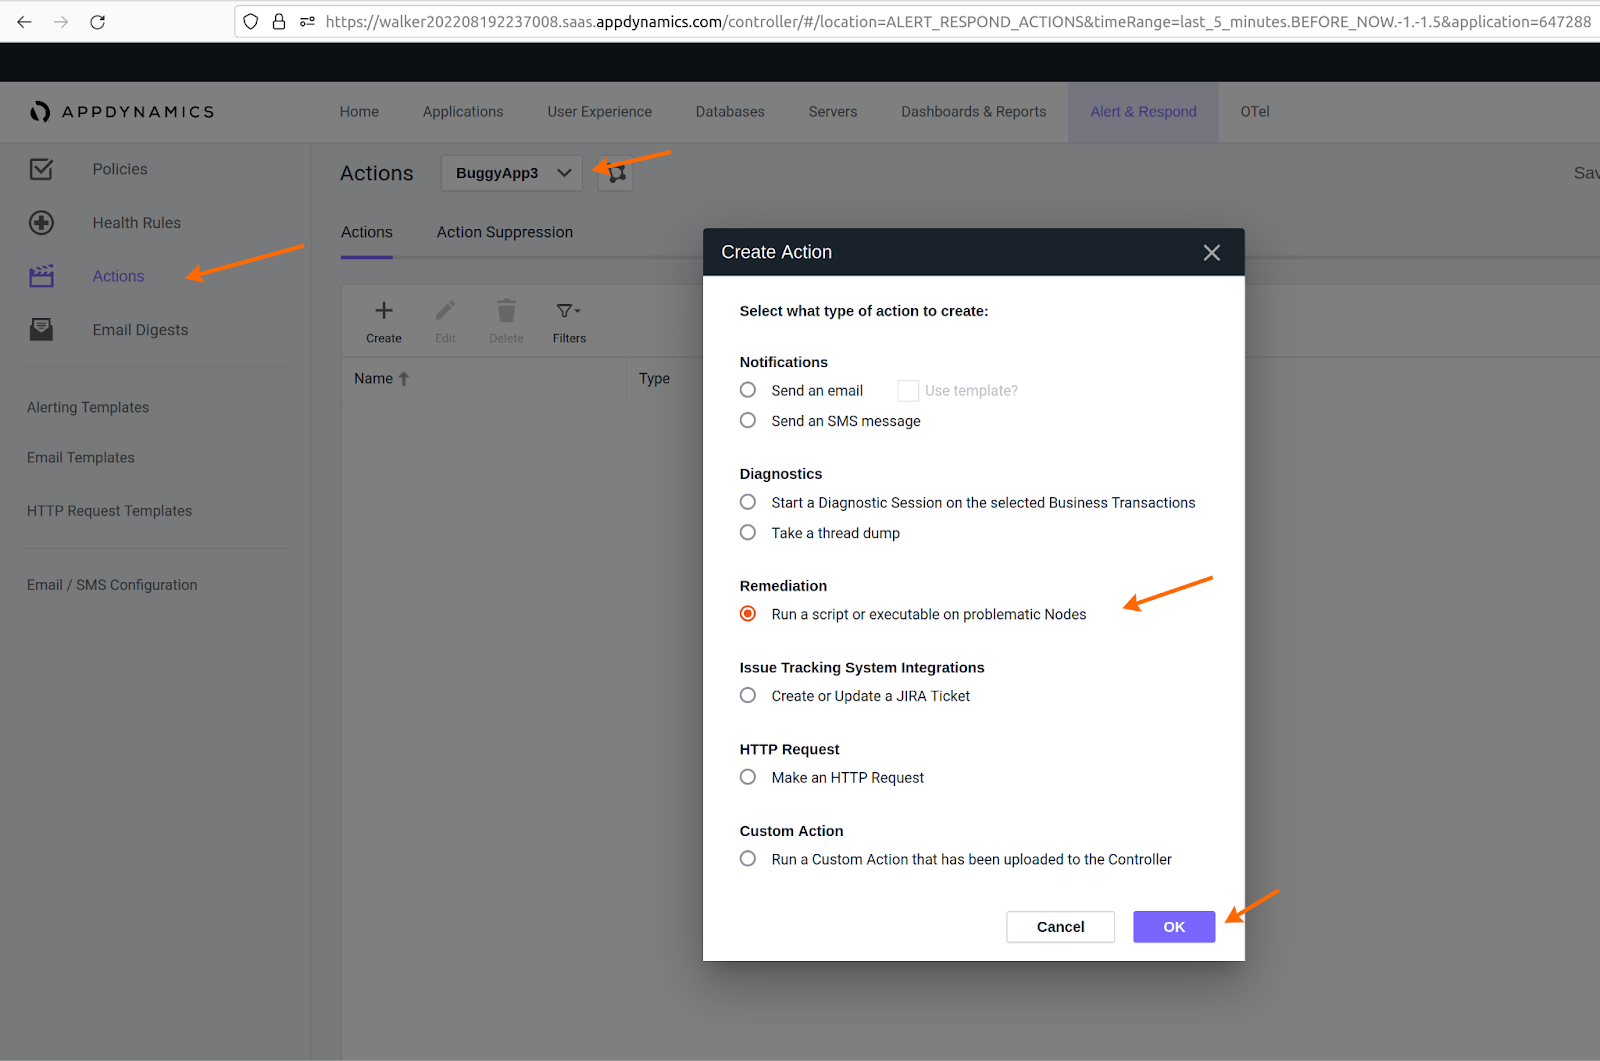
Go to Alert & Respond from the main menu on the top.
Click Actions menu from the left sidebar.
Select your application from the Applications dropdown. In the below screenshot you will see the “BuggyApp” application is selected.
Now click the +Create button.
Choose Remediation: Run a script or executable on problematic Nodes.
Click OK.
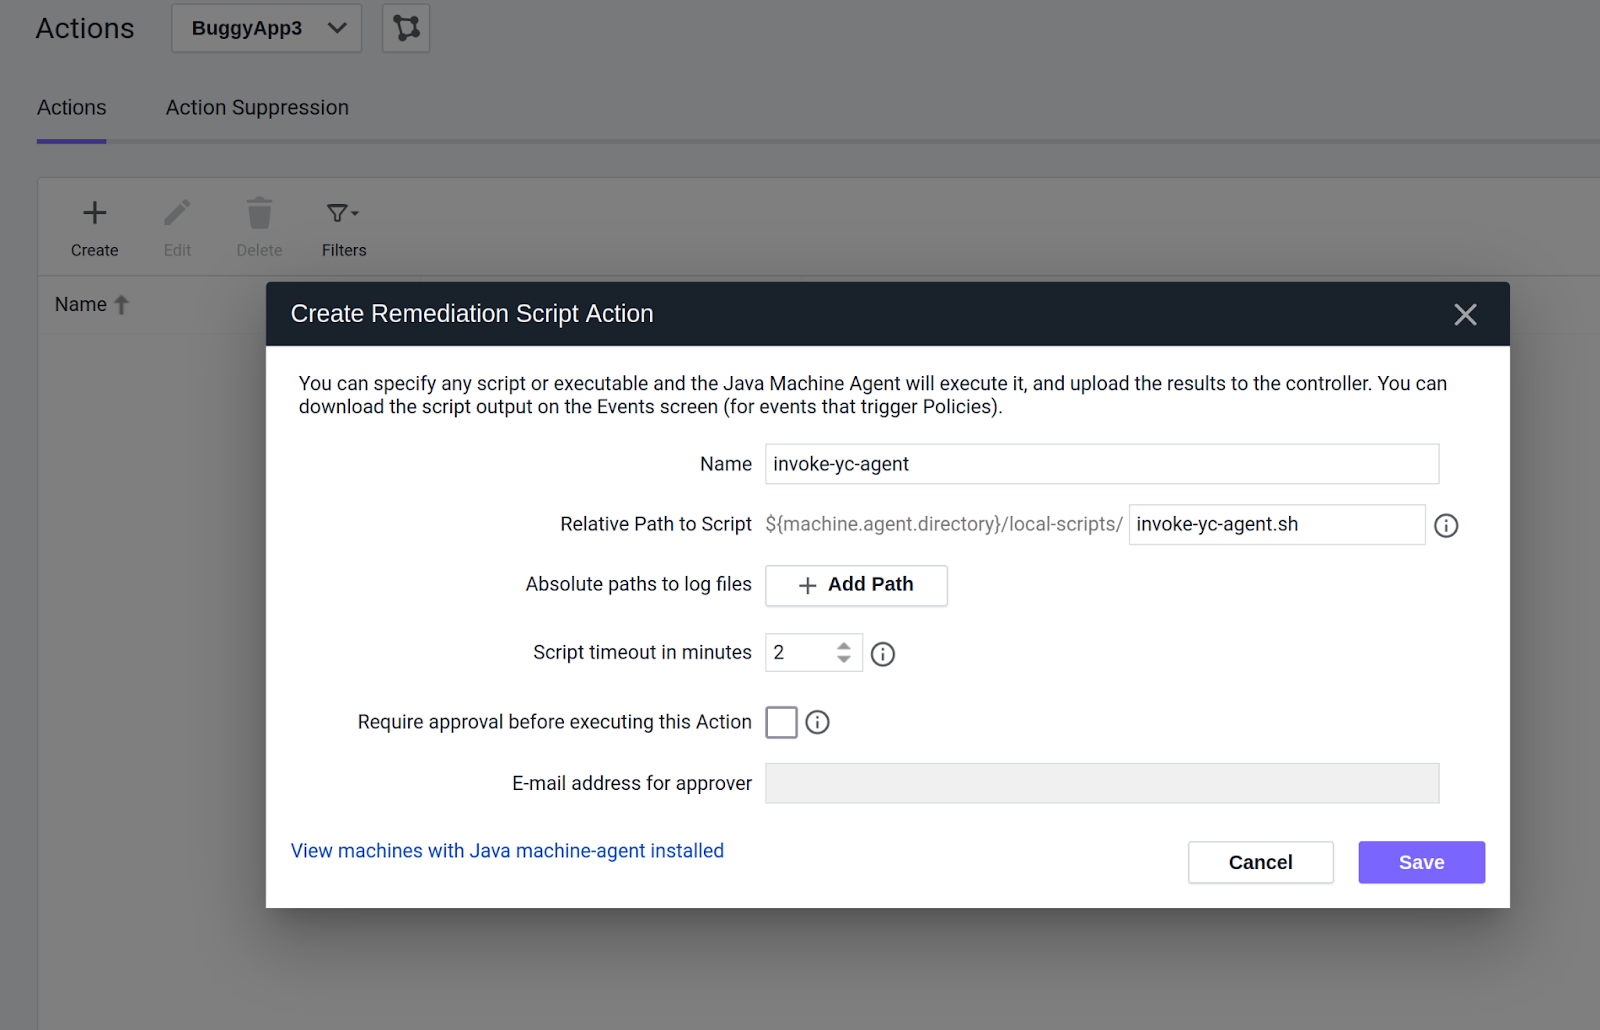
- Then fill out the next form which is Create Remediation Script Action form.
a) Enter invoke-yc-360-script in the name field.
b) Enter invoke-yc-360-script.sh in the Relative Path to Script field.
- Then click Save.
# 6. Install the invoke-yc-360-script.sh
- Add the below script in
invoke-yc-360-script.shfile and save this file to/opt/appdynamics/machine-agent/local-scripts/directory.
#!/bin/bash
if [ -z "${ProcessID}" ]
then
      printf "Could not get PID from ProcessID\n"
      exit 1
else
      printf "Got PID ${ProcessID} from ProcessID\n"
      printf "Going to execute: yc-360 script -c yc-config.yaml -p ${ProcessID}\n"

      # TODO: Update yc-360 script path to your installation
    # See https://docs.ycrash.io/
      # /opt/yc-360-script/yc -c yc-config.yaml -p ${ProcessID}
fi
2
3
4
5
6
7
8
9
10
11
12
13
14
- Set it as an executable:
chmod +x /opt/appdynamics/machine-agent/local-scripts/invoke-yc-360-script.sh
- Check the file owner, it should match with the parent directory.
# 7. Create a Policy
Goto Alert & Respond from the main menu on the top.
Click Policies from the left sidebar.
Select your application from the Applications dropdown.
Click the Create Policy Manually button.
Fill the form:
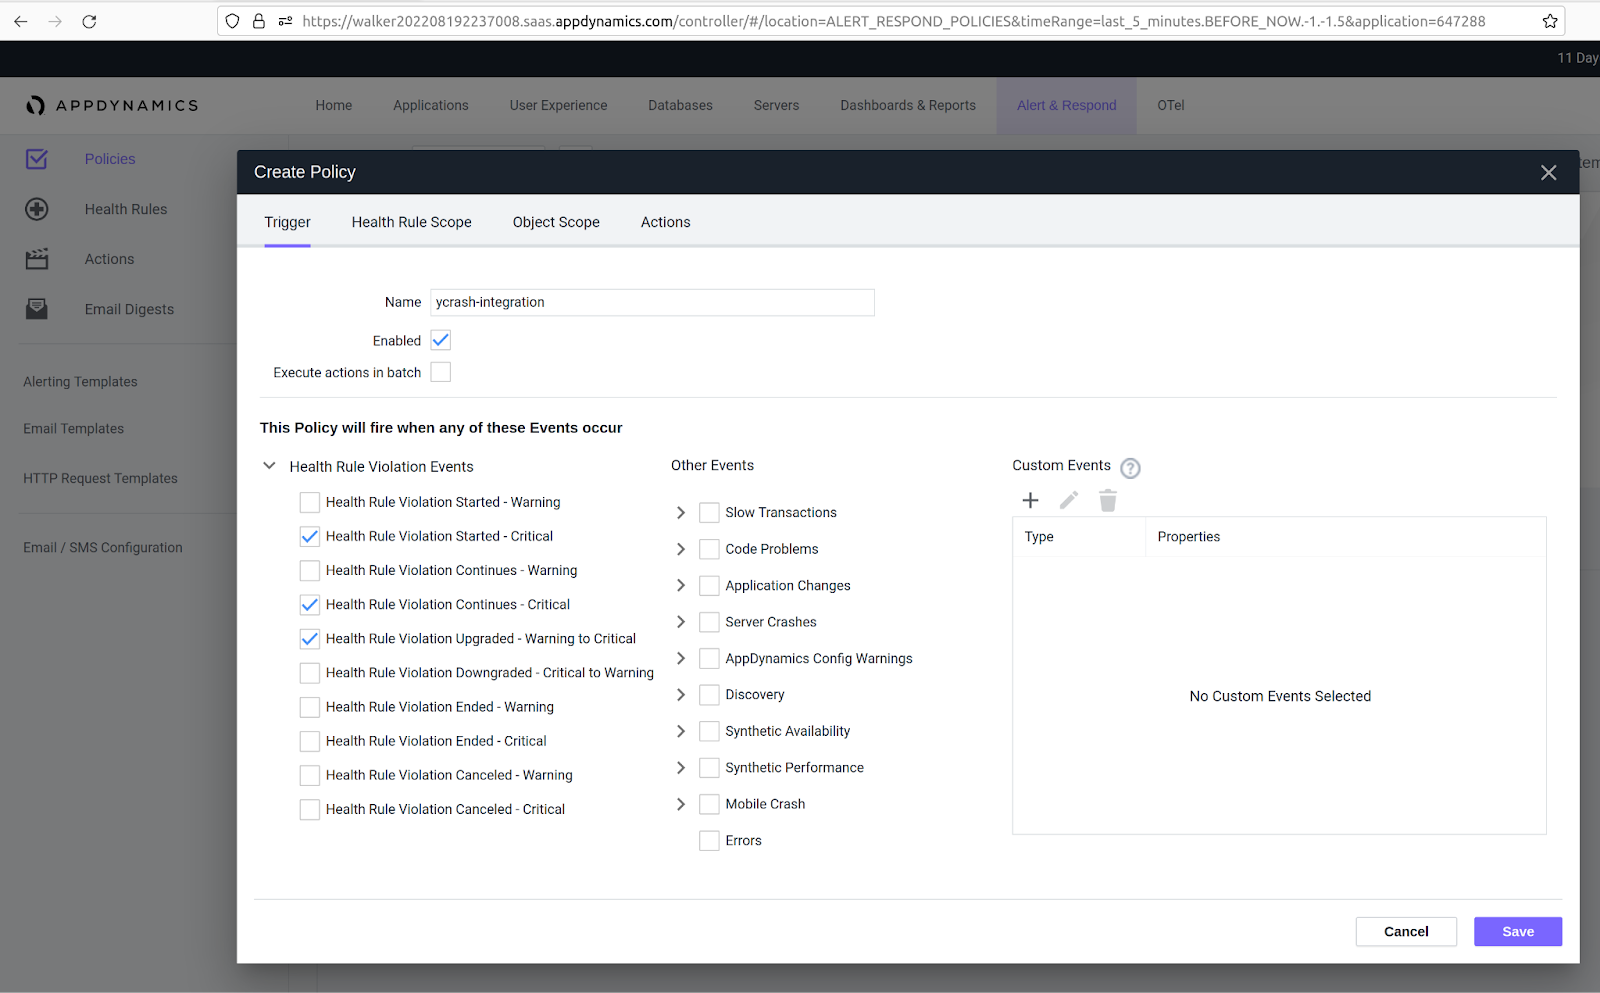
a) On tab Trigger
- Enter ycrash-integration in the name field.
- We would suggest to uncheck Execute actions in batch.
- Health Rule Violation Events:
- Enable Health Rule Violation Started - Critical.
- Enable Health Rule Violation Continues - Critical.
- Enable Health Rule Violation Upgraded - Warning to Critical.
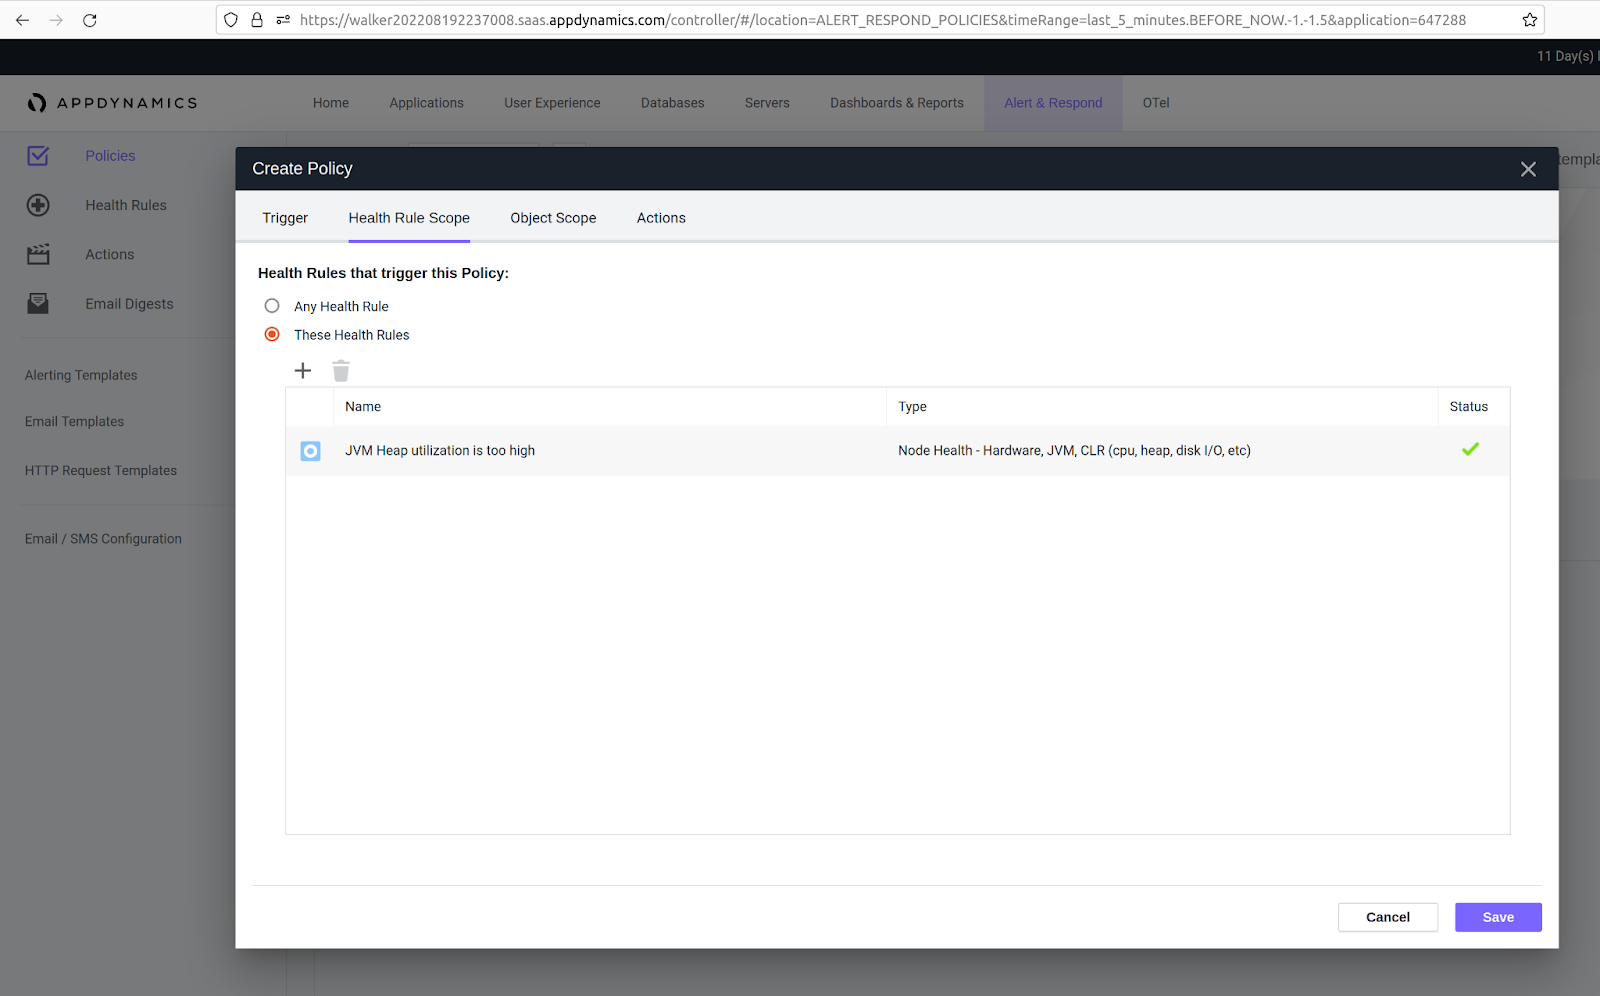
b) On tab Health Rule Scope
- Choose These Health Rules.
- Click + button.
- Select the health rules. In this document, we are going to use JVM Heap Utilization is too high.
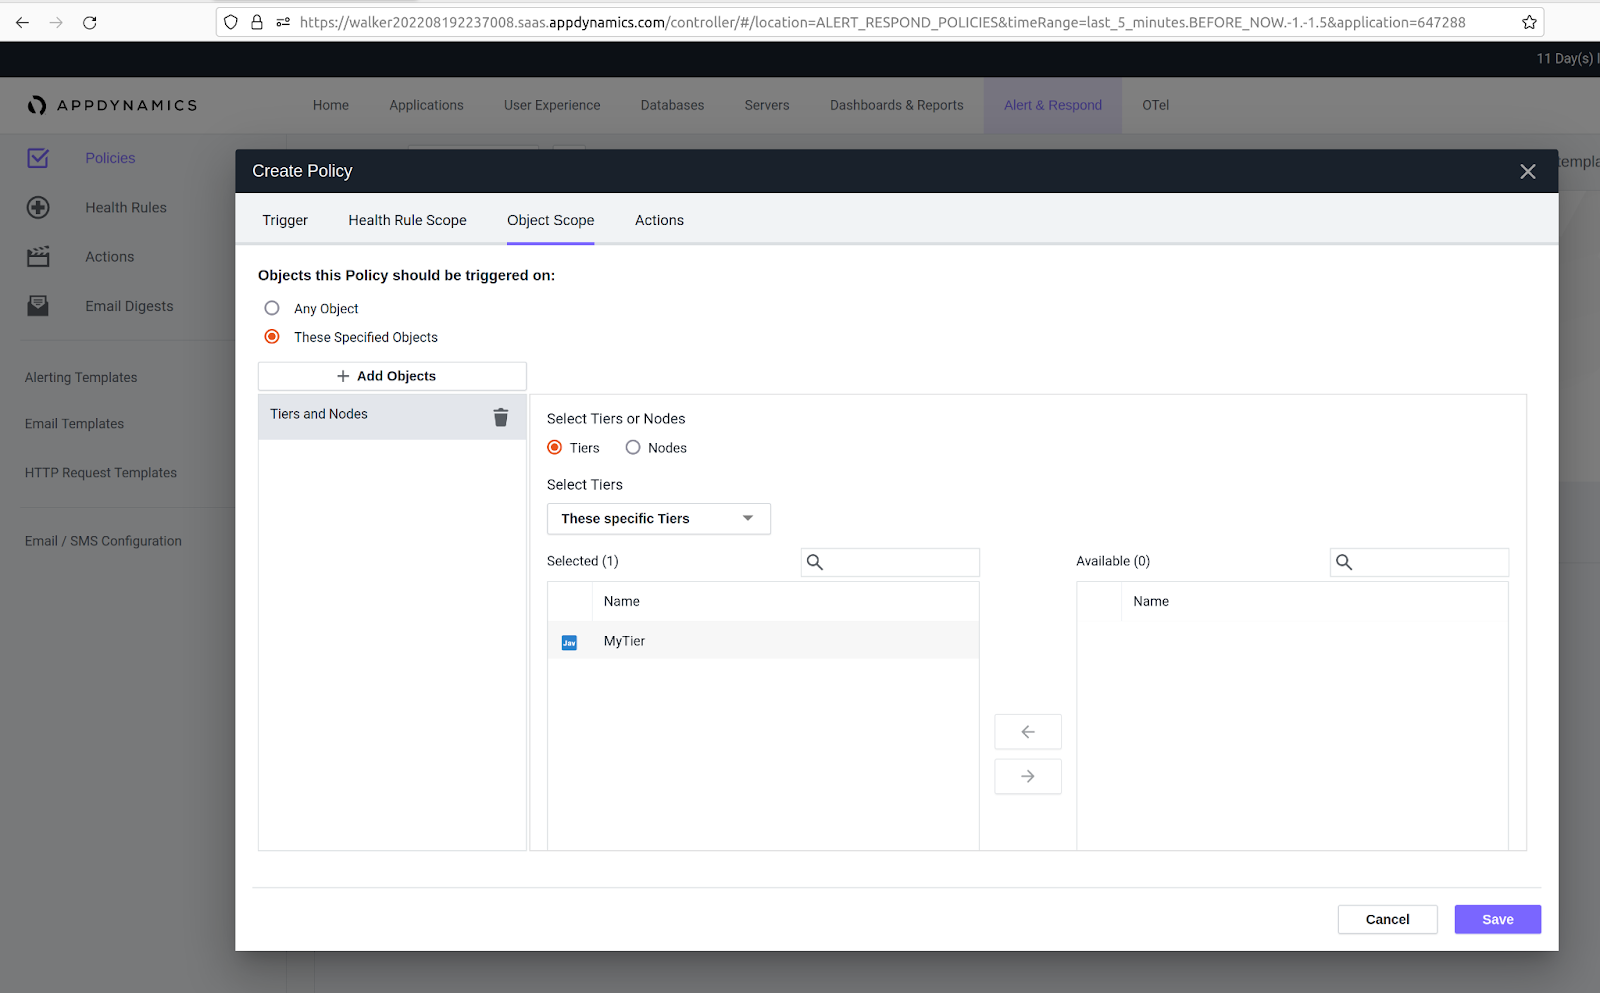
c) On tab Object Scope
- Choose These Specified Objects.
- Click the + Add Objects button.
- Select Tiers and Nodes.
- Select your relevant Tiers or Nodes or select all tiers if all your servers are running this setup.
d) On tab Actions
- On Actions to Execute, click + button.
- Select the one you created previously: invoke-yc-360-script.
- Click the Select button.
- Execute Action on Affected Nodes:
- Execute Action on: 100% of the Nodes
- Click OK button.
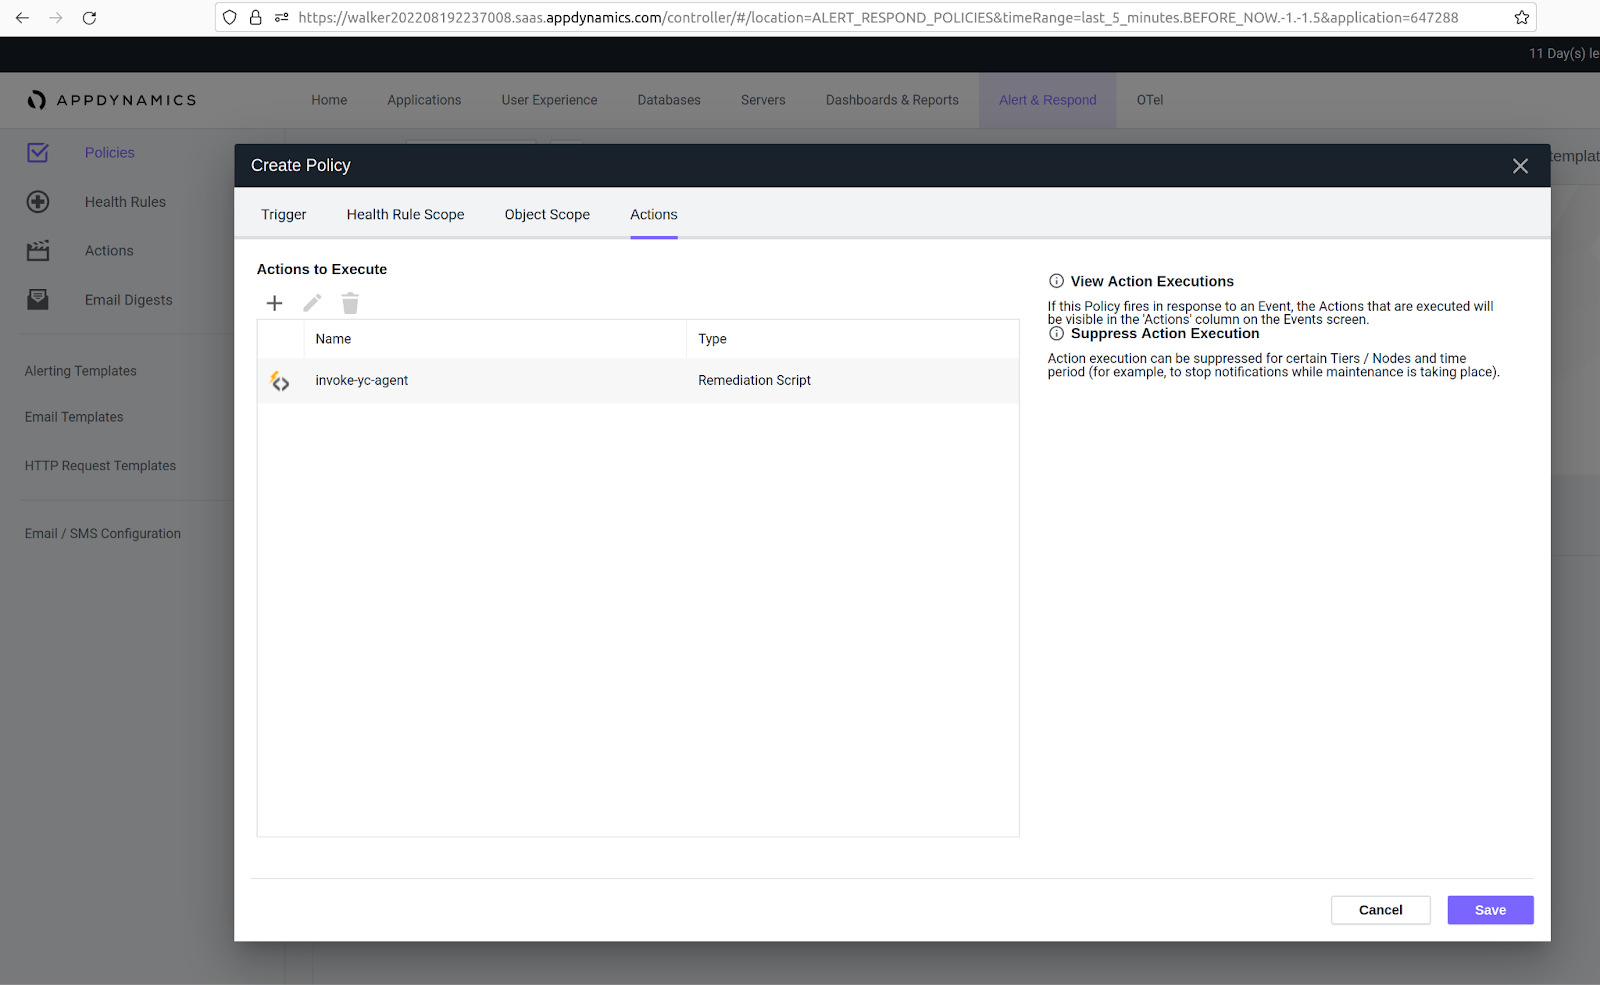
- Click Save button.
# 8. Review Health Rules Events and Invocations
Go to Alert & Respond from the main menu on the top.
Click Health Rules from the left sidebar.
Select your application from the Applications dropdown.
Select the Health Rule you just attached to the policy.
Check the Evaluation Events on the right side.
In this document, we are using
BuggyAppso we are triggering a memory leak to violate JVM Heap Utilization is too high.
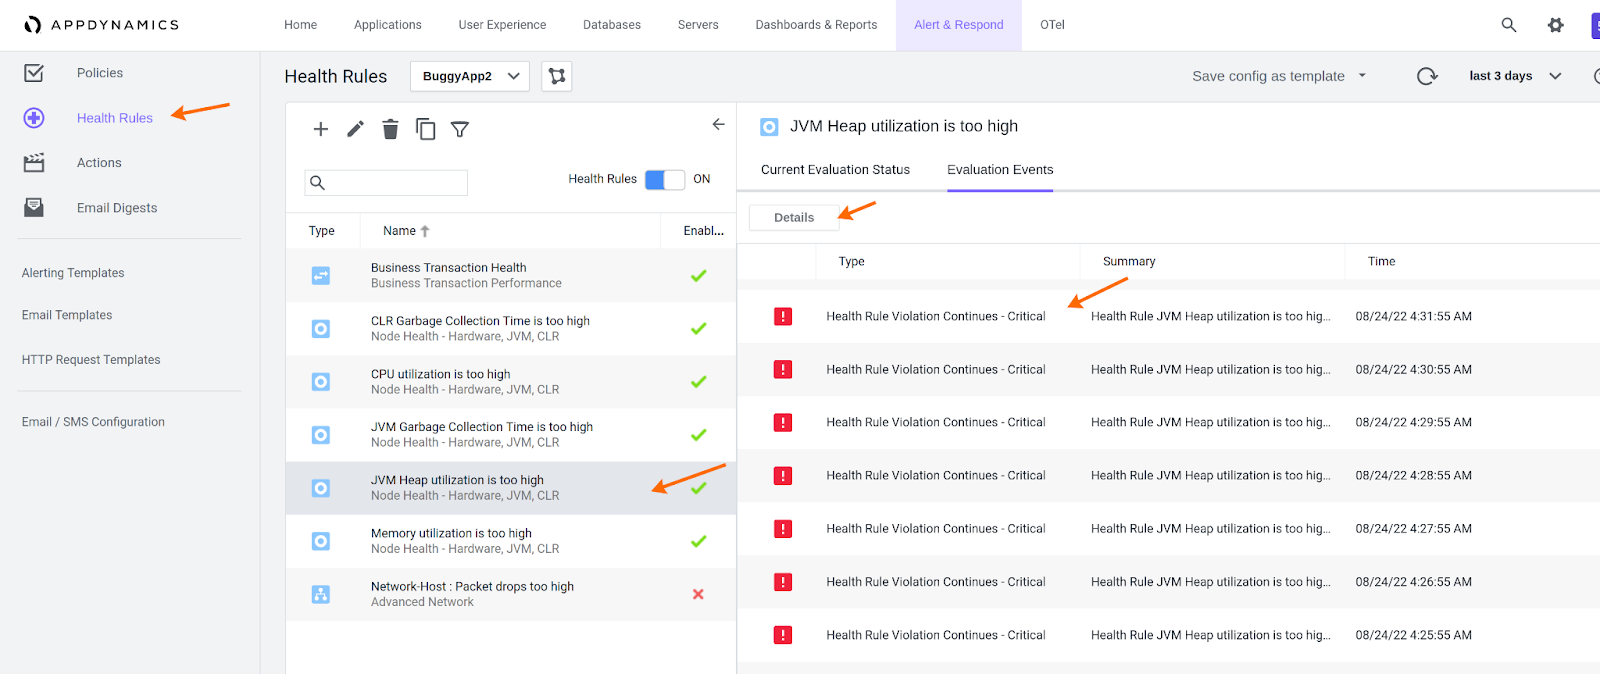
- Once the rule is violated, the event shows up there. Click the Details and you will see the invoked script and the output.
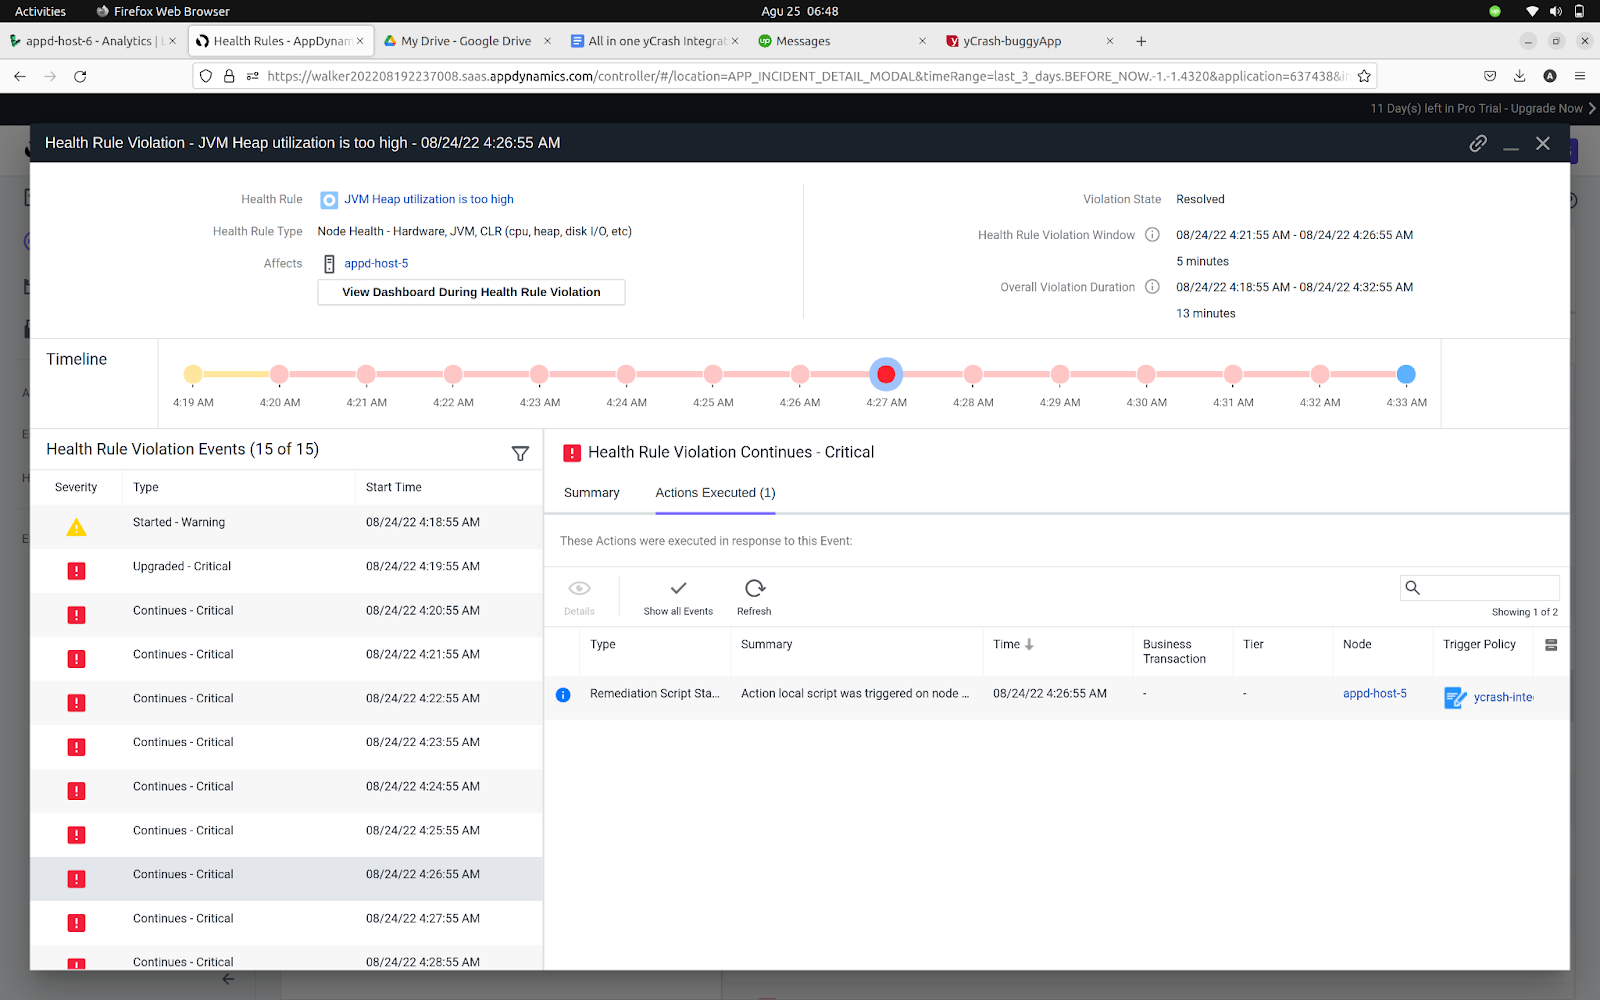
- At this point, if the script works, it should trigger the yc-360 script on demand command.